Moved

This blog has moved to offthespork.com. Thanks!

Sunday, January 31, 2010

Cookbook Challenge: Week 11, Mixed

Recipe: Persian jewelled rice with chicken
From: The Jewish Kitchen by Clarissa Hyman


The theme for this week's Cookbook Challenge is "mixed", which is a fairly open theme. I had a few ideas for things I could do for this week. I thought that I could make something that had different textures, or a dish that had a mixture of sweet and savoury. I also thought about making something that needed a mixer as part of the preparation, or cooking something that involved mixed berries.

Persian jewelled rice with chicken


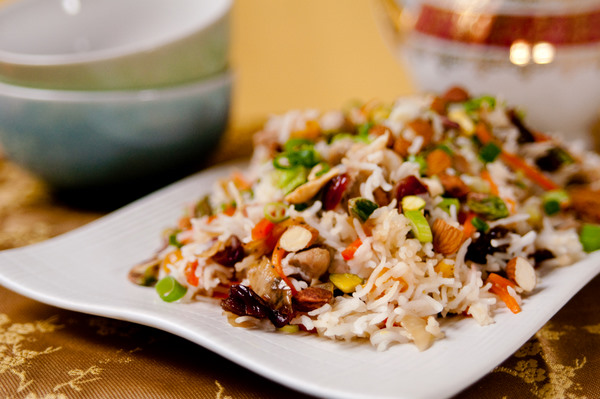
In the end, I decided to do this Persian jewelled rice with chicken. It fits into the "mixed" theme, because the dish has a mixture of dried fruit, as well as being a mixture of sweet and savoury.

I had great intentions of cooking this dish in the late afternoon, so that by the time it was cooked, it would still be bright enough to take photos, and then I could exercise before dinner (it's habit, I must exercise at the same time on my exercise days otherwise it doesn't happen!). My good intentions were almost dashed by the fact that I ended up having a nana nap on the couch for a couple of hours..... and by the time I got off the couch, the cool change had kicked in and storm clouds had gathered over the house, cutting out a lot of light.

Fortunately, I didn't need as much time as I had thought to cook the dish, and there was still enough light to take photos, despite the rain. Phew. Glad I didn't end up regretting that nana nap, because really, is there anything better than a nap in the arvo??

Persian jewelled rice with chicken


The recipe itself was a bit of a kerfuffle. It seemed overly complicated for what is essentially cooked rice mixed with chopped up chicken and pieces of dried fruit. I did follow the recipe when making it, but it would be different if I were to do it my way. My way would involve cooking the rice by absorption method, and once cooked, mixing in the cooked chicken and dried fruit. It would be less complicated and take much less time!

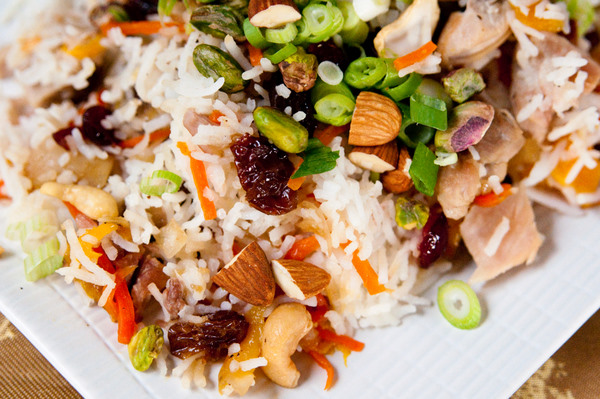
I was a bit worried that the rice would end up far too sweet (check out the part where carrots are simmered in water and 200g of sugar!) but it was fine. With all the dried fruit, there were definite sweet parts to it, but not overly so. The nuts and the chicken helped balance it out.

I'm not sure that I would bother following the recipe again, although I did like the idea of the rice studded with bits of coloured fruit. Like I said, it seemed overly complicated and while it was tasty, it wasn't tasty enough to be worth all that effort!

See previous Cookbook Challenge posts here

Update: See the round up for this week at My Food Trail.

Persian jewelled rice with chicken


Persian jewelled rice with chicken

From The Jewish Kitchen by Clarissa Hyman

Serves 6

500g basmati rice
1.5kg roasting chicken, jointed
salt
2 large onions, chopped
finely shredded rind of 1 large orange (I used lemon)
2 large carrots, cut into fine slivers
200g sugar
4 tablespoons sunflower oil
150g raisins
150g dried barberries or cherries (I used cranberries)
150g dried apricots, chopped into small pieces
a few strands of saffron, dissolved in 2 tablespoons hot water (optional)
shredded almonds and chopped pistachios to garnish

Rinse the rice well, and leave it to soak in cold, salted water for a few hours.

In a non-stick pan, place the chicken and one of the chopped onions. Sprinkle in a little salt and then cover and cook over a very low heat (don't add any water). Let it cook for about 45 minutes. The chicken will simmer in its own fat and juices. Cool, then bone and skin the chicken and cut into small pieces. Set aside, and reserve any juices from the chicken.

Next, place the orange rind, carrots and sugar in a pot, and cover with 300ml water. Boil for 10 minutes and then drain.

In a frying pan, cook the other onion in half the oil until translucent, then add the raisins, barberries and apricots. Cook for a few minutes, then add the orange and carrot mixture. Drain, and set aside.

In a large non-stick or heavy based saucepan, bring 1.5 litres of water to the boil. Add 1 tablespoon salt, and then add the drained rice. Bring it back to the boil and then lower the heat to a gentle simmer. Let the rice simmer for 3 minutes and then drain. Rinse with tepid water and shake gently into the sieve to keep the grains separate. Set aside.

Wash out the pan, and add the rest of the oil. Swirl the oil around so it covers some of the sides as well as the bottom.

With your hands, sprinkle in a layer of rice (this helps to aerate it). Top the rice with some chicken, then fruit. Continue with the layers, trying to build up into a conical shape, and finish with a layer of rice. Poke a few holes through the rice with the end of a wooden spoon.

Drizzle over the reserved chicken juices, the remaining oil and the saffron. Cover the pot with a clean tea towel, then a tight lid, and cook for 1-2 minutes on a high heat. Then reduce the heat to very low and let it "steam" for a further 40 minutes.

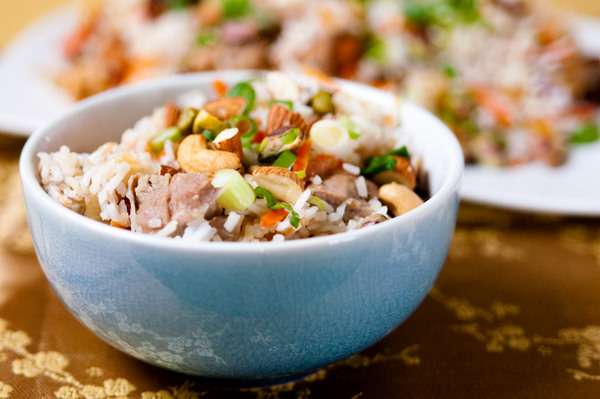
Remove the pot from the heat and leave to stand for five minutes before lifting off the lid. Serve in a mound on a large platter, garnished with almonds and pistachios (I just mixed mine all through the rice).


Tuesday, January 26, 2010

Cookbook Challenge: Week 10, Cool

Iced beetroot soup


Recipe: Iced beetroot soup
From: Jill Dupleix's Lighten Up


Argh! I'm late for (last week's) Cookbook Challenge! Despite knowing what I was going to make at the beginning of the week, I'm still late with it! In my defense though, I was going to do it in the weekend but ended up spending all day Saturday painting the walls of our bottom floor. I thought that I would be able to squeeze in some quick cooking on the day, but the painting took much longer than I thought, despite getting up early (7:30am on a SATURDAY, thank you very much). We were out on Saturday night, and out all day on Sunday, so there was no opportunity to do my Cookbook Challenge recipe.

I did take yesterday (the day before Australia Day) off, but guess what I spent it doing? More painting! I painted the lower stairway, and again that took all day. Anyway, here I am finally, only a couple of days late. Thank goodness today is a public holiday!

Iced beetroot soup


The theme for Week 10 is "cool" and guess what? Unlike the past five weeks, I didn't do a sweet recipe! Instead, I did a chilled beetroot soup. I can't say I've ever had a beetroot soup before, much less a cold one, so had zero expectations of this one.

Well I'm pleased to say that the soup is very good and would be very refreshing on a hot day. It's quite spicy with the shallots and raw garlic (warning, it tends to hang around for a bit afterwards!), while still being sweet and earthy. Plus it's a gorgeous ruby-red colour. It could be the prettiest soup ever!

After making the soup, I still have half a bunch of beetroot left. I wonder what I should do with it. Perhaps I could work it into this week's theme (mixed)...?

See previous Cookbook Challenge posts here.

Update: See the round up for this week at My Food Trail.

Iced beetroot soup


Iced beetroot soup

From Jill Dupleix's Lighten Up

Serves 6 to 8

3 shallots
2 celery stalks (I didn't have any and left this out)
500g beetroot, cooked and peeled
2 garlic cloves, crushed
2 tablespoons red wine vinegar
2 tablespoons extra virgin olive oil
300ml vegetable stock or water
sea salt and pepper
1 tablespoon horseradish cream
100g thick Greek yoghurt
chives to finish

Roughly chop the shallots, celery and the beetroot and mix with the crushed garlic, wine vinegar and olive oil.

Cover and leave it to marinate for a couple of hours or overnight.

Place the beetroot mixture into a blend and blend to a smooth puree. Add the stock, salt and pepper and blend again until smooth.

Chill until ready to serve.

Stir the horseradish cream with the yoghurt. When ready to serve, add a dollop of the horseradish yoghurt on top of the soup, grind over some pepper and spear with a chive.


Thursday, January 21, 2010

Pocky / Pejoy series: Blueberry Cheese Double Pretz

After our time in Japan (I only have a couple more posts to go!), Alastair and I spent 5 days in Hong Kong and China. While in China, I noticed in the supermarket that there were lots and lots of Pocky and Pejoy flavours (there were probably tons in Japan too, but I wasn't on the look out). You can buy Pocky in Australia, but not many flavours - normally just chocolate, strawberry, plus a couple of others.

Pocky and Pejoy are biscuit stick snacks made by the Japanese confectionery company, Glico. Pocky sticks are dipped in a variety of flavoured creams, while Pejoy contains the flavoured cream inside the stick. There is also Pretz, which are usually savoury with no cream coating.

Pocky/Peejoy


Bro went to HK a couple of weeks after we returned, and I asked him to bring me back some Pocky and Pejoy. Lo and behold, he came back with a mountain of various flavours! I’ll do a post each time I try one of the flavours.

Blueberry Cheese Double Pretz


The first flavour I tried was neither Pocky nor Pejoy - not off to a brilliant start for a Pocky/Pejoy series! Anyway, the first box was the Blueberry Cheese Double Pretz. It’s “Double” Pretz rather than normal Pretz because there is a small line of flavour piped along the length of the biscuit stick, as well as the stick being flavoured with the blueberry cheese (I assume!).

Blueberry Cheese Double Pretz


The Pretz had a touch of sweetness, with a fake blueberry flavour. The blueberry was similar to a flavour that you would find in bubblegum, but quite mild.

I enjoyed them and found them very moreish. One thing that I really liked was how the sticks were only slightly sweet – there was a savouriness to the biscuit stick that made me want to keep eating them! I nearly polished off the whole box in one sitting. Thumbs up for this flavour!


Tuesday, January 19, 2010

Japan: Kyoto – Yakitori typhoon special

On Wednesday, 6 October 2009, Typhoon Melor, the first typhoon to reach landfall in Japan in two years, arrived on Japan’s south coast. The next day, it hit central Japan, bringing heavy rain and winds, disrupting flights and train services and sadly causing a couple of deaths.

We were in Kyoto at the time of the typhoon, and while the rain was heavy, it didn’t really affect the Kyoto area. Thank goodness! But for dinner on Wednesday night, we went to a yakitori restaurant, where there was a typhoon special – the price of all dishes were 50% off!

From what I can ascertain, yakitori literally means grilled chicken, and is usually used to refer to skewered chicken pieces. On the menu at the restaurant was chicken, chicken and more chicken.

Alastair and I ordered a few dishes to share (actually, the ordering went along the lines of me saying, “How about we order this, this, this and this?” And he said, “Okay.”)

Yakitori restaurant


I ordered us chicken skin skewers – there was an option for plain (with sauce) and garlic. We ordered two of each. These are the plain chicken skin skewers - they were fantastic. Fatty, delicious, a bit chewy in parts. Oh yeah.

Yakitori restaurant


The garlic skewers were also good, although I did shake off most of the garlic. I love cooked garlic, but not such a fan of raw garlic. I hate how raw garlic refuses to leave the party.

Yakitori restaurant


We also ordered some chicken meat skewers with sauce. They were good, but the chicken skin ones were the way to go.

Yakitori restaurant


Next were some rather large chicken wings. The wings could be done plain or hot, to which we had no hesitation – hot please! They were only mildly hot, but had a good crispy skin and tender meat that came easily off the bone.

Yakitori restaurant


We also ordered two minced chicken patties. The patties were served with a raw egg for dipping. The patties were juicy and somehow worked with the raw egg.

Yakitori restaurant


I always try to ensure we eat some vegetables, even if it's a token effort, so I ordered us a salad. It was quite a good salad, topped with fried lotus root slices, and I think that white item was deep fried chicken skin. Which pretty much negated the health factor. Buh bow. It was a losing battle anyway, with all that chicken!

Oh, and we noticed an interesting item on the menu at the restaurant - chicken sashimi. We didn’t order it. I’m a fairly adventurous eater, but can’t stomach the thought of eating raw chicken. Seriously, it makes me feel ill just thinking about it. Obviously that "raw chicken = salmonella" message has been drummed into me! Are Japanese chickens not at risk of salmonella?

Have you tried chicken sashimi? Would you?


Sunday, January 17, 2010

Cookbook Challenge: Week 9, Berry

Blueberry and coconut muffins


Recipe: Blueberry and coconut muffins
From: Australian Women's Weekly "Kitchen"


So guess what the theme is this week for the Cookbook Challenge? Berry. And guess who did berry pancakes LAST week? Yep, genius over here!

Obviously I don't plan my weekly recipes in advance. If I had been clever, I would've done the pancakes this week and found a different recipe for the sweet week. But I didn't, so I spent a bit of time this weekend looking for another berry recipe. I figured that I was going to bake something, since I didn't fancy my chances of finding a savoury recipe that also incorporated berries.

And muffins it was! These muffins were pretty easy to put together, although the batter was extremely thick. Taste wise, they're not a light, fluffy cake-like muffin - the coconut gives them a chewy, heavy texture that is vaguely similar to a scone. I'm not really selling them, I know, but let me tell you that they are strangely moreish. I ate one, and another, and another.... I hate to tell you how many I ate today (FOUR, for goodness sake).

I think that means they're good.

See previous Cookbook Challenge posts here.

Update: see what everyone else made at My Food Trail.

Blueberry and coconut muffins


Blueberry and coconut muffins

Adapted from The Australian Women's Weekly Kitchen

Makes 12


1 & 1/2 cups self raising flour
1 cup wholemeal flour
90g cold butter, chopped
3/4 cup caster sugar
1 & 1/4 cups buttermilk
1 egg, beaten lightly
1/3 cup (desiccated coconut)
150g fresh blueberries

Preheat the oven to 200°C and grease or line a 12 hole muffin tin.

In a food processor, pulse the chopped butter and caster sugar until it resembles large breadcrumbs.

Sift the flours into a large bowl (add in any stuff from the wholemeal flour that couldn't make it through the sieve), and add the butter mixture. Add the buttermilk, egg, desiccated coconut and blueberries. Mix until just combined.

Spoon the mixture into the muffin tin holes and bake for about 20 minutes, or until a skewer in the centre comes out come. Stand the muffins in the tin for five minutes, and then remove on to a wire rack to cool.


Wednesday, January 13, 2010

Japan: Kyoto - Tea ceremony

As mentioned in the ramen post, Kyoto was our last stop in Japan. Kyoto is one of Japan’s best preserved cities, and was the capital and the emperor’s residence from 794–1868. The city is full of temples, shrines and has an amazing cultural heritage.

Golden Pavilion


While in Kyoto, one of the places we saw was Kinkaku-ji – the Temple of the Golden Pavilion. The Golden Pavilion is a Zen Buddhist temple, and the original Kinkaku-ji was built in 1397 as a retirement villa for Shogun Ashikaga Yoshimitsu. He intended to cover the exterior of the building with gold, but only managed to coat the ceiling of the third floor with gold leaf before he died.

After Ashikaga‘s death, his son converted the building into a Zen temple. Over the years, the temple was burnt down and restored several times (the story of temples and shrines in Japan, huh!).

Golden Pavilion


The present structure dates from 1955, and was rebuilt true to the original except that both the upper stories were covered in gold leaf, in accordance with Ashikaga’s original intentions. In 1987, a new lacquer coating and gilding with golf leaf was added that was five times thicker than the original coating. It’s a beautiful complex, with the Golden Pavilion situated in its garden at the edge of a lake, and is VERY popular for school excursions. In fact, the day we visited, there were hundreds of school kids there in their uniforms. As mentioned in previous Japan posts, we were “shrined/templed out” well before we reached Kyoto, but the Golden Pavilion was a worth while visit. It was really beautiful, despite the hordes of school children (okay, they were kind of cute).

Tea ceremony demonstration
Tea bowl and bamboo whisk


While in Kyoto, we also attended a tea ceremony demonstration.

The Japanese tea ceremony is a traditional ritual that involves the preparation and presentation of matcha, powdered green tea. The development of the ritual was influenced by Zen Buddhism, and the tea is prepared by a skilled practitioner and served to a small group of guests. The setting is very important, as is the preparation of the tea, and the study of tea ceremony takes many, many years.

Tea ceremony demonstration


We entered the small, tatami lined room, and took a seat by the wall. To one side was an open door, that lead out to a small Japanese style garden. It was raining that evening, so we could hear the pitter patter of the falling rain as our kimono-clad host outlined the ritual behind the tea ceremony. She explained to us the importance of the setting, drawing our attention to the calligraphy in the scroll alcove, and the simple flower arrangement nearby. She told us that the scroll and the flower arrangement are always carefully chosen to set the mood and the atmosphere of the tea ceremony.

The tea ceremony consists of many steps, and the guiding philosophy rests on four important principles: harmony, respect, purity and tranquillity. Our host described how tea ceremonies are normally run – there can be shorter ceremonies that consist of sweets, tea and sometimes a light meal, while there are more formal gatherings that include a full-course kaiseki meal that can last up to four hours.

Tea ceremony demonstration


We were all given a sweet to eat. The sweet is eaten before drinking the tea, as it helps to counteract the bitterness of the tea. Our host explained the importance of the equipment used in the ceremony. A wide range of equipment is available, and different styles are used for different events and in different seasons. The essential equipment included tea bowls, a tea caddy which holds the powdered tea, a tea scoop which is generally carved from a single piece of bamboo, a tea whisk, also carved from a single piece of bamboo, and a cloth used for wiping the tea bowls. All different sizes and styles of tea bowls are available, and some bowls are extremely valuable. Slight idiosyncrasies and flaws in the bowls are considered to make bowls more interesting than another and are prized.

Tea ceremony demonstration


Our host started the tea ceremony demonstration, her movements slow and considered. Everything was done with great care, whether it was wiping all the utensils, folding her cloth, scooping tea into a tea bowl, adding water, and whisking the tea until it was thick and frothy. It’s hard to describe exactly what it was like – her movements were almost like a dance, they were so exact and smooth. The room was dim and silent apart from the sound of falling rain. It was incredibly atmospheric!

Tea ceremony demonstration


We had an opportunity to try whisking the tea before tasting it. Whisking it to a smooth froth was harder than it looked and my tea ended up still a bit clumpy. The tea was quite bitter and also quite thick, similar to the thickness of a milkshake. Definitely not something that you would drink every day.

Tea ceremony demonstration


I loved the demonstration. It was fascinating to watch our host prepare the tea, and learn about all the thought and ritual behind it. After the demonstration, Alastair and I wandered back out into the rain, feeling a bit more tranquil. It was well worth the experience.


Sunday, January 10, 2010

Cookbook Challenge: Week 8, Sweet

Berry buttermilk pancakes


Recipe: Berry buttermilk pancakes
From: Stephanie Alexander's The Cook's Companion


The theme for this week's Cookbook Challenge is "sweet" and I decided to make pancakes. What is sweeter than a leisurely Sunday breakfast of pancakes with the one you love? Not much, I think!

The Cook's Companion suggests preparing the batter the night before, up to the stage before adding the egg whites, for a quick breakfast. Great idea, although preparing the batter from scratch doesn't actually take all that long. It's the cooking that takes the longest, though there are machines to help with that.....

Berry buttermilk pancakes


The original recipe didn't specify any sugar to be added to the pancake batter, so I included a tablespoon of caster sugar. Even with the additional sugar, these pancakes aren't very sweet - smothering them in maple syrup is a definite requirement. They are beautifully fluffy though and definitely worth the effort.

And a tip - don't be tempted to just throw your berries into the batter before cooking, unless you don't mind irregular sized pancakes. I made three perfect round pancakes before I got bored and threw all the blackberries into the batter. After that, all the pancakes were interestingly shaped! Oh well. Judging by the five pancakes Alastair scoffed down, the strange shapes didn't detract from the taste!

See previous Cookbook Challenge posts here.

Update: See the round up for this week at My Food Trail.

Berry buttermilk pancakes


Berry buttermilk pancakes

Adapted from Stephanie Alexander's The Cook's Companion

Makes 18 pancakes


3 eggs, separated
2 cups buttermilk
60g butter, melted
300g plain flour, sifted
1 teaspoon salt
1 tablespoon caster sugar
1 teaspoon baking soda, sifted
extra butter or oil spray
About a cup of fresh berries

Beat the egg yolks well and then whisk in the buttermilk and melted butter.

Add the dry ingredients to the egg mixture and fold in.

Whisk the egg whites to soft peaks and fold into the batter.

Heat a frying pan and lightly grease. Ladle in 1/4 cup of batter and scatter some berries over the uncooked batter. When bubbles form, flip with a spatula and cook the other side before transferring to a plate. Repeat until all the pancakes are ready.

Serve with additional fresh berries and maple syrup.


Friday, January 8, 2010

Japan: Kyoto – ramen

Ramen


Kyoto was our last stop in Japan (sob, sob, sob) and when we got there we realised we had eaten almost everything we had wanted to on the trip - apart from ramen. Naturally this had to be rectified! So ramen for dinner it was, at a small place around the corner from our hotel. It sold ramen, gyoza and beverages.

Ramen


Alastair and I both ordered the chashu (pork) ramen in a pork broth and shared a serve of gyoza. The creamy coloured broth was porky, salty and rich, and the noodles had the perfect texture – soft but still slightly firm and springy. The pork meat was extremely tender, on the verge of falling apart in the broth. The gyoza, that I neglected to photograph, were also delicious. They had a super soft skin and very tasty meaty filling.

Ramen


In fact, we enjoyed the ramen so much we went back for dinner on our last night in Japan. I must have been feeling lazy by this stage of the trip, because I didn’t take a photo of Alastair’s ramen or note down what my ramen was (fail blogger). Alastair had the chashu ramen again – but this time he had double pork! I wish I had requested double pork, the meat really was fantastic. Instead, I choose a slightly different ramen from the first night, the name of which escapes me, but it was equally as delicious.

Ramen


The egg in my ramen was fantastic - the white was set, but the yolk was still gooey and runny. Neat, huh?

Ramen
Poster on the wall showing how the pork is prepared


I have eaten ramen in Melbourne before, but they couldn't compare to these bowls of deliciousness. There are several food bloggers who seem obsessed with finding a good ramen, and now I finally "get" the obsession. Ramen is fantastic! I won't say that I'm obsessed at this stage, but.... any suggestions for good ramen places in Melbourne will be gratefully received. :D


Tuesday, January 5, 2010

Japan: assorted bento boxes

Shinkansen


During our trip in Japan, we travelled across the country by trains and Shinkansen. The Shinkansen, a high speed “bullet train”, was fantastic. The Nozomi service is the fastest, with the trains reaching speeds of up to 300 km/h (!). You can’t travel on Nozomi on a Japan Rail pass, so we were on the Hikari trains, which stop more often and reach speeds of 220km/hr – 280km/hr.

Shinkansen


The Shinkansen is seriously fantastic! The trains pull into the station within a minute of their scheduled arrival (just like all trains in Japan, actually) and depart almost to the second of their scheduled departure. Inside the trains, the seats are wide, spacious, clean and very comfortable. There’s no fuss of needing to check baggage or clear security, you just walk on to the train, take a seat and in a couple of hours you’re in a different part of the country. It’s a shame that Australia doesn’t have the population to support high speed rail between cities because taking the train was a hundred times better than flying.

You can’t eat on normal trains in Japan, but the Shinkansen is an exception. Someone with a snack cart comes down the aisle every now and again, and you can purchase drinks, snacks and bento boxes. There are also stalls in all the stations that sell bento boxes to take on the train. Here are some pictures of the assorted bento boxes we ate.

Bento


This one was an octopus themed bento box - rice, a sausage cut to look like an octopus (cute!), takoyaki balls, baby octopus, half an egg, and pickles. I was pretty much expecting that the baby octopus would be tough and fairly inedible, but it was surprisingly tender. The takoyaki was not great though, but I suppose that is to be expected!

Bento


This one was Alastair’s and it was appropriately man sized - it was massive! There were two layers of thin steak, rice, pickles, tamago, potato salad and crumbed pork. There was something underneath the steak but I can’t remember what it was now – possibly salad or vegetables, judging by the cherry tomato you can see peeking out.

Bento


This one was purchased on the Shinkansen - look how cutely it was packaged. It's a giant peach!

Bento


Unfortunately, taste wise it was not great. At the bottom was a layer of vinegared rice, covered by flavourless egg, and then on top was various seafood. It was all kind of bland and unexciting. Some of the fish was really vinegary as well, and it just didn't do it for us. Oh well.

Aside from buying bento on the Shinkansen and at the train station, every convenience shop and supermarket that we went also sold bento. Microwaves were available to heat them up if they were meant to be eaten warm. They were generally quite cheap so were good for an inexpensive lunch. At the beginning of our trip, I was a bit worried about our budget and tried to eat more cheaply. Lots of people gave me the impression that Japan was really expensive, but after a couple of days I figured out that food wasn't particularly expensive (Japanese food that is, I think Western food is a different story. But why would you visit Japan and eat Western food anyway?). I mean, food might be expensive compared to the rest of Asia, but not if you compare it to a Western country. So I relaxed after a couple of days and after that there were no more convenience shop bentos! Here are some from early in our trip:

Bento


This one had rice, nuggets of fried pork (I think! either pork or chicken) and potato salad.

Bento


This one had crumbed pork, half a boiled egg, rice, noodles and that brown thing was a fishy/seafoody ball. It was better than it looks and sounds.

Bento


This one was pretty simple, just soba noodles with dipping sauce.

Bento


And this one had fried pork, rice, and a bit of spaghetti. The spaghetti bit was a bit strange, but the pork was nice.

I should mention the negatives though, I felt bad about all the packaging associated with the bentos. And while we tried very hard not to use disposable chopsticks in Japan, the bentos that we purchased to eat on the Shinkansen came with disposable chopsticks inside the packaging, so we couldn't refuse them. Gah. And I've read that the convenience shops throw out a lot of their perishable food at the end of the day, which contributes to the rather staggering amount of food waste in Japan.

Even with the negatives, it's a shame that convenience shops in Australia don't sell food like this - it's better than a dodgy sandwich or meat pie any day!


Sunday, January 3, 2010

Lemon cheesecake

Lemon cheesecake


Mhmmmm cheesecake. I love cheesecake but it's not something I have often because it's so decadent. But any food consumed during Christmas has no calories (right??) so I took this cheesecake along on the day. There was tons of food already, so we only ate half of it, and the other half went home with me. I was super happy - because it meant I was able to plate up a piece to take photos. That's right, I didn't care about eating the leftovers, I just wanted to photograph it!

I have made baked cheesecakes tons of times before (see here or here), but have never made a gelatine based cheesecake. It's actually much easier to make than a baked one, although I really do like a baked cheesecake.

Lemon cheesecake


If you're like me, and don't like your desserts sickly sweet, this cheesecake is perfect. I think I added double the amount of rind specified (I grated the rind of two lemons and just decided to add it all in) so it was tangy, but not too much so. The biscuit base did seem quite soft, although perhaps that was due to sitting in the fridge for a day. Next time I make it, I'm going to try baking the biscuit base in the oven to firm it up more.

I do still prefer a baked cheesecake over unbaked, but this is a good version and I'll make it again. What about you - do you have a cheesecake preference? Do baked cheesecakes or unbaked cheesecakes have your heart?

Lemon cheesecake


Lemon cheesecake

From The Australian Women's Weekly Food We Love

Serves 8


250g packet plain sweet biscuits
125g butter, melted
250g cream cheese, softened
395g sweetened condensed milk
2 teaspoons finely grated lemon rind
1/3 cup lemon juice
1 teaspoon gelatine
1 tablespoon water

In a food processor, pulse the biscuits until they resemble fine breadcrumbs. Add the melted butter and process until combined. In a 20cm springform tin, press the biscuit mixture evenly over the base and side, and refridgerate for about 30 minutes or until the biscuit mixture is firm.

Beat the cream cheese with an electric mixer until it is smooth. Add the condensed milk, rind and lemon jice and beat until smooth.

In a small heatproof bowl, sprinkle the gelatine over the water, and stand the bowl in a small pot of simmering water. Whisk until the gelatine dissolves and let it cool for 5 minutes.

Stir the gelatine mixture into the cream cheese mixture. Pour it into the biscuit crumb crust, cover and refrigerate for about 3 hours or overnight until set.


Friday, January 1, 2010

Cookbook Challenge: Week 7, Soft

Chocolate mousse


Recipe: Chocolate mousse
From: Gorgeous Desserts


Hello 2010! It felt like it was only the other day when I did the Christmas Cookbook Challenge post, and now it's time for the next one AND it's a brand new year! Wow!

We had a quiet BBQ at home for New Years Eve. The theme this week for the Cookbook Challenge is "soft" so for dessert I made chocolate mousse to tick off my Challenge recipe. I actually can't believe that we're seven weeks in, and I have managed to do a recipe each week AND post it on time. If anyone is considering joining in but is worried about whether they'll be able to keep up - if I can do it, you can too.

I'm not a huge chocolate eater, but I do like very dark chocolate, so most of the chocolate I buy is 70% cocoa. That's what I used to make this mousse, and unfortunately it was probably a mistake! The mousse is basically just chocolate and eggs (and a bit of brandy) so it was SUPER SUPER rich, and none of us could finish a whole serve. It didn't help that we had all just eaten a big bowl of Dany's rocky road ice cream. Doh!

The two good thing about the recipe is that it's incredibly simple, and it doesn't use cream. If you want to try it, I would recommend using chocolate with a lower cocoa percentage. And don't eat a big bowl of ice cream beforehand!

See previous Cookbook Challenge posts here.

Update: See what everyone else made this week at My Food Trail.

Chocolate mousse


Chocolate mousse

From Gorgeous Desserts

Serves 6


250g dark chocolate (about 50% cocoa is recommended), broken into pieces
6 medium eggs, separated
2 tablespoons brandy or strong black coffee

Melt the chocolate in a large bowl set over a pot of simmering water. When melted, set aside for a few minutes so that it's not too hot, and then stir in the egg yolks and brandy/coffee.

In another bowl, whisk the egg whites with an electric mixer until stiff. Fold a couple of tablespoons of egg whites into the chocolate mixture, and then fold in the remainder of the egg whites in two goes.

Transfer the mousse to a serving bowl or individual glasses. Cover with cling firm and chill for several hours or overnight until firm.

Mine were decorated with a dusting of icing sugar, cocoa and a few chocolate covered coffee beans.


Related Posts with Thumbnails