Moved

This blog has moved to offthespork.com. Thanks!

Sunday, February 28, 2010

Gnocchi party: potato gnocchi with blue cheese sauce

Gnocchi party


Welcome to the gnocchi party! I am just turning up on time to the party - but in my defense it has been a busy week. My mother-in-law Annette, and her husband Terry, have been visiting, and so we have been out all week (it has been a major eating week!).

A few weeks ago, Penny from Addictive and Consuming rounded up several interested bloggers for a gnocchi party. Everyone was to make gnocchi, following the theme "unami", and post it oh, right about now!

I have never made gnocchi before, but being a carboholic, I love it. The recipe I followed was from The Cook's Companion, and it was very straight forward and easy to make for a gnocchi beginner.

Potato gnocchi with blue cheese sauce

Adapted from the Cook's Companion

Serves 6-8

For the gnocchi:


salt
1 kg potatoes - Stephanie recommends Toolangi delight, desiree or nicola
300g-325g plain flour

For the blue cheese sauce:

125g blue cheese
1/2 cup milk
20g butter
freshly ground pepper
2 tablespoons cream

Give the potatoes a good wash, and then place them in a large pot of water until tender. Drain and peel.

Gnocchi party


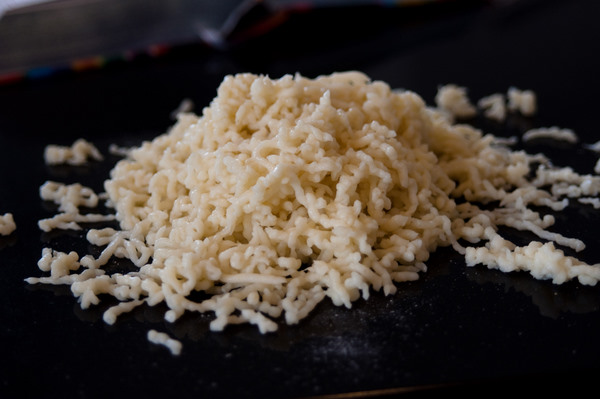
Pass the potatoes through a food mill or ricer directly on to a clean work surface and sprinkle with salt. I don't have a food mill/potato ricer so I used a steamer basket that has large holes. It took AGES. But my arms got a good workout!

Bring a large pot of lightly salted water to a boil in preparation for cooking the gnocchi.

Gnocchi party


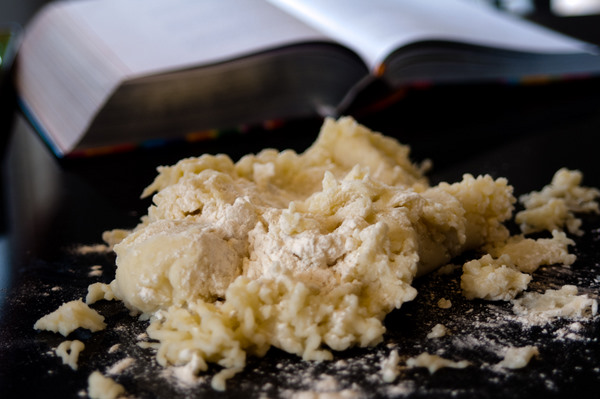
With one hand, sprinkle the potato with flour and, using the heel of the other hand, work it in. Be as quick and deft as possible (I wasn't either of these things!). Continue until all the flour is incorporated - I only used 2/3 of my flour. Having never made gnocchi before, I wasn't sure how stiff/sticky it was supposed to be, so I just stopped when it didn't seem to want to take any more flour.

Gnocchi party


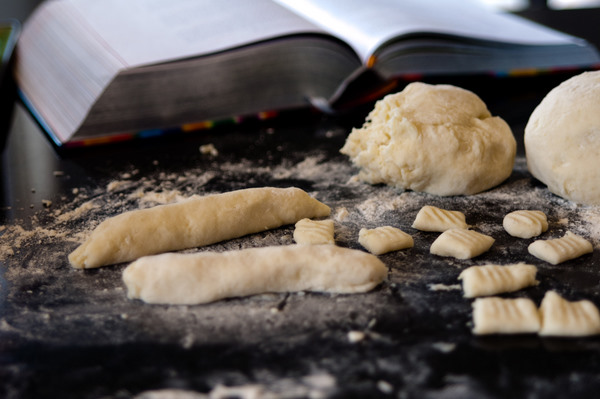
When the cooking water is boiling, roll the potato mixture into a long rope and cut into 1cm pieces.

Gnocchi party


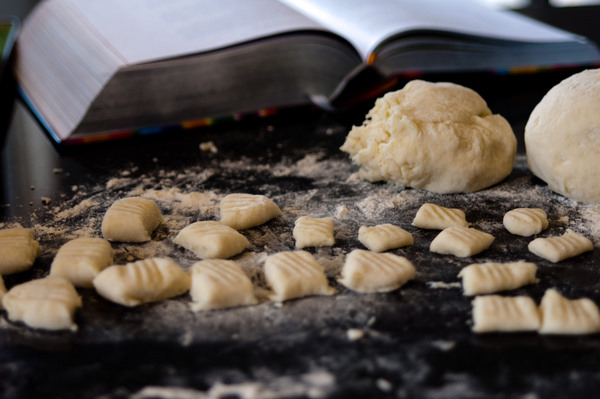
Roll each piece across the curved side of a fork using one finger to create the traditional shape. I had NO IDEA what I was doing here so my gnocchi were all weirdly shaped!

Lower the heat for the pot of water until it is simmering. Drop in some gnocchi, and wait a few minutes until they rise to the surface. Lift them out with a slotted spoon, drain for a moment over the pot, and tip into a bowl (into a warmed oven to keep warm if you're making lots). Repeat with the remaining gnocchi.

I served the gnocchi with a blue cheese sauce. The sauce should be hot on the stove while you're cooking the gnocchi. Here's the recipe for the sauce:

Combine the cheese, milk, butter and pepper in a heavy-based frying pan over a gentle heat and cook until thick and creamy. Add the cream, increase the heat a little, and cook, stirring, until the sauce starts to thicken. Keep warm while you cook the gnocchi.

Gnocchi party


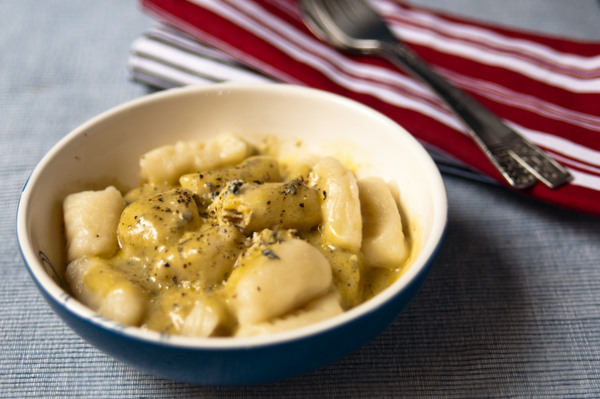
When all the gnocchi is cooked, pour the sauce over it, shake gently and serve.

For my first time making gnocchi, I was rather pleased with them. They were (relatively!) light, and delicious with the blue cheese sauce. I did find the sauce rather strong so a bit less blue cheese or less sauce over the gnocchi would be a good idea next time. And I'm sure there will be a next time - since I now know how easy gnocchi is to make. I might buy a potato ricer first though!

Check out the other gnocchi party attendees:

Gnocchi Gnudi made by our lovely host, Penny from Addictive & Consuming
Braised Beef Short Ribs Adobo on Potato Gnocchi made by Divina from Sense & Serendipity
Pan-fried Pumpkin Gnocchi with Truffle Paste and Basil made by Mardi from Eat, Live, Travel, Write
Chocolate-filled Plantain Gnocchi, with chillies for Dessert made by Ozoz from Kitchen Butterfly
Malfatti a la Al Di La made by Trix from Tasty Trix
Tuna & Anchovy sauce gnocchi with roasted vegetables made by Conor from Hold the Beef
Gnocchi di Patate con Funghi e Salvia made by Mellie from Tummy Rumbles
Gnocchi Chicken Tikka made by Shirley from Enriching your kid
Sweet Potato Gnocchi with Nori Butter made by Natasha from Five Star Foodie
Gnocchi in creamy mushroom sauce made by Christine from Christine's Recipes


Saturday, February 27, 2010

Japan: Kyoto - cooking class

After a bit of a break, I'm back with another Japan post! Bear with me, I only have a couple left to write.

While in Kyoto, we did a cooking class where we made rolled sushi, miso soup, and spinach salad with a roasted sesame dressing. And then we ate it for lunch!

Kyoto cooking class


For the sushi, rice had been cooked before we arrived (otherwise it would have taken ages) and once we all sat down, the rice was tipped out into a wooden bowl. A mixture of rice vinegar, water, sugar and salt was poured in and "cut" through the rice in a folding motion (to prevent breaking the grains). The rice was then fanned to quickly cool it.

The rice was left to finish cooling, and next we made dashi. Dashi is a Japanese soup stock, and is a fundamental ingredient for many Japanese recipes, including miso soup. We made one of the most common versions, using dried kelp (kombu) and dried bonito flakes. The kombu is wiped with a damp cloth, and then soaked in a pot with water for at least thirty minutes. After the soaking time, the pot is put on the heat and just before the water boils the kombu is removed. When the water boils, a big handful of bonito flakes was added and the heat turned off. After all the flakes had sunk to the bottom, the liquid was strained and was ready to use.

Kyoto cooking class


The dashi was used to make miso soup. We were given three types of miso to taste - white, yellow and brown. It was interesting to taste the difference in flavour between the three misos. The darker the miso, the more salty it was. The white had a touch of sweetness to it, and the yellow was less salty than the brown. I think we used the brown to make our miso soup, which also had seaweed and diced tofu. Yum.

Kyoto cooking class


After the miso soup, we moved on to rolled egg omelette (tamago) for our sushi rolls. This was cool! I had always wondered how the egg was rolled up so nicely. To make the tamago, several eggs were beaten lightly with a bit of dashi, soy sauce, mirin, salt and sugar. To produce the rolled layers, a small amount of egg was added to a well oiled rectangular pan - just enough to cover the bottom. The pan was tilted to cover the bottom evenly with egg.

Kyoto cooking class


When the egg was nearly set, the egg was rolled up towards the front of the pan using a spatula.

Kyoto cooking class


The rolled up egg was then pushed to the back of the pan, and the empty part of the pan was re-oiled. Then another layer of egg was poured in. The rolled omelette was lifted up with chopsticks and the pan was tilted to allow the uncooked egg to flow underneath it.

Kyoto cooking class


When the uncooked egg was nearly set, the omelette was rolled towards the front again. The remaining egg mixture was cooked in the same manner, with the rolling process repeated to create a single roll with many layers. I had a turn at rolling the omelette, and it was much easier than it sounds in this somewhat convoluted explanation!

Kyoto cooking class


Next, it was time to assemble the sushi rolls. A layer of the prepared sushi rice was spread on to a sheet of nori (dried seaweed) on top of a bamboo mat, leaving a strip clear of rice.

Kyoto cooking class


Fillings were placed in the middle of the rice. In our rolls, we had shitake mushrooms, our tamago, and crabstick (it's not cool, but I love it).

Kyoto cooking class


The strip of nori that was clear of rice was slightly wetted. Then, holding the fillings down, the sushi was slowly rolled up.

Kyoto cooking class


It was all rolled up tightly, with the bamboo mat being used to press it all together and shape it into a cylinder.

Kyoto cooking class


We got to roll our own sushi. This was Alastair's one.

Kyoto cooking class


And Alastair's one all cut up. Pretty good for someone who not only has never rolled sushi before but also doesn't cook!

Kyoto cooking class


And here's mine!

Kyoto cooking class


And here's my sushi roll cut into pieces. I had never made rolled sushi before - I was pretty pleased with it. It was easier than I thought it would be.

Kyoto cooking class


Along with the miso soup and sushi rolls for lunch, we also had a small salad of spinach with roasted sesame dressing. Oh, and tea and pickles (of course). The spinach was very simple but delicious. The spinach was boiled and cut into small sections, and the dressing was made with ground roasted sesame seeds, dashi, soy sauce and a bit of sugar.

We had a great time at the class, although next time I would like to make something more advanced. Even Alastair enjoyed it - perhaps I could get him to like this "cooking thing" after all!

Fushimi Inari Taisha


After the cooking class, Alastair and I headed off to see the Fushimi Inari shrine, which is a Shinto shrine that is dedicated to Inari, the god of rice, sake, prosperity and in modern times, business. It's one of Kyoto's oldest shrines and is noted for the thousands of small torii gates that line the long path up the hill behind the shrine.

Fushimi Inari Taisha


The torii are donated by businesses, and it's a very striking place to visit. It takes about two hours to walk the whole trail, so we didn't make it to the end. At first we didn't realise how far it stretched, and Alastair started counting all the gates. With 10,000 of them, it would have taken a while!

That's just about it for the Japan posts - I may have a couple of random bits and pieces that I'll post, as well as one or two about Hong Kong, China and Macau. Thanks for sticking with them. I have loved writing them and remembering all the great food we ate!

(And if you would like a recap, all the Japan posts can be found here.)


Thursday, February 18, 2010

Cookbook Challenge: Week 14, Japanese

Recipe: Japanese Mushroom Noodles
From: Lighten Up


Japanese mushroom noodles


A very quick post for the Cookbook Challenge this week. I have a lot to do tonight because Alastair and I are off to Sydney tomorrow evening for a long weekend. His cousin is sailing in a regatta, so we are going up to watch him (hopefully) win!

The theme for this week's Cookbook Challenge is "Japanese" and I needed something that was quick, easy and preferably healthy. I chose to make Japanese mushroom noodles from Lighten Up, which fit all those requirements.

I wanted to use different mushrooms, such as enoki and oyster, but there are no Asian grocery stores near my work, and I didn't have time to go anywhere else to get any. So I only had Portobello mushrooms in my noodles but I added a can of baby corn so it wasn't too boring.

This meal was really simple to put together - perfect for a busy weeknight. And now, I better get off the internet and get stuff done! Back next week!

See previous Cookbook Challenge posts here.

Update: See what everyone else made at the round up on My Food Trail.

Japanese mushroom noodles


Japanese mushroom noodles

From: Lighten Up

Serves 4


4 dried shitake mushrooms
250g dried udon noodles
200g fresh Japanese mushrooms eg enoki, oyster (I only had Portobello mushrooms)
2 tablespoons vegetable oil
1 tablespoon finely shredded fresh ginger
sea salt and pepper
1 tablespoon miso paste
1 tablespoon mirin
2 tablespoons soy sauce
chives to finish

Soak the dried shitake in a cup of boiling water for at least 30 minutes. Drain, reserving the water. Remove the stalks and discard. Slice the caps finely.

Cook the udon noodles in salted water for 8 minutes, or until tender. Drain and set aside.

Trim the fresh mushrooms and slice them thickly.

Heat the oil in a frying pan. Add the ginger and the fresh and dried mushrooms. Cook on a medium-low heat for a few minutes, or until soft.

Stir in the reserved water from the mushroom, apart from three tablespoons. Season with salt and pepper and let it simmer for a few minutes.

Put the miso paste in a small bowl and whisk in the three tablespoons of hot reserved mushroom water. Add this, and the mirin and soy to the mushrooms.

Toss with the drained noodles and serve scattered with chives.


Sunday, February 14, 2010

Cookbook Challenge: Week 13, Love

Moist chocolate beetroot cake
Kindly ignore the big crack in my cake, thank you.


Recipe: Moist chocolate beetroot cake
From: Nigel Slater's Tender


Oh, it's Valentine's Day! And Chinese New Year! Rather aptly, this week's theme for the Cookbook Challenge is "love" and this week I'm breaking out a Nigel Slater recipe because I love his book, Tender. and I love his writing.

This week I made a moist, chocolate beetroot cake, which also fits in with the theme because beetroots are red, and red is the colour of luuuuuuuuuuurve. Additionally, everyone loves chocolate, and any people who are non-chocolate lovers are not worth knowing (only kidding, you non-chocolate lovers! I still love you!).

Moist chocolate beetroot cake


The first step to making this cake is to cook some beetroots until soft. Once that is done, it's no more difficult to put together than any other moist chocolate cake (unless you're particularly clumsy and are at risk of staining your kitchen red!). There are some strange steps in the recipe that I didn't quite understand - 200g of chocolate is melted in a bowl over a pot of simmering water, but the recipe specifies not to stir it. Later, once the chocolate is almost melted (but not stirred!), hot espresso is poured over, and butter is added. This is left to soften, and then it is stirred later. Why is this? Why can't the chocolate and butter be melted together and stirred? If there's a good reason for it, I'd like to know!

The other part that confused me is the egg whites. In the recipe, the egg whites are whipped until stiff, and then sugar is folded into the whites. This is then added into the chocolate mixture, and finally the flour is folded in. Most cake recipes have you fold in the egg whites last, so you don't lose the air that you so carefully whipped in. In the end, I deviated from the recipe and folded my egg whites through last. But if there is a good reason for the former method, I would like to know what it is!

Moist chocolate beetroot cake


I don't think my folding through the egg whites last affected my cake negatively. I also baked it for a bit longer than the recipe specified and it still seemed to come out fine, if you ignore the big ass crack. Nigel says about this cake: "This is a seductive cake, deeply moist and tempting."

It is moist, indeed. Really, really moist. But anyone who tells you that you can't taste the beetroot in it is a big fat liar. I didn't think that the beetroot was "subtle or elusive", I thought that it screamed beetroot. The cake is a very dark purple brown, unlike plain chocolate cake, and the beetroot added an earthy, tanginess to it that I was unsure about. Nevertheless, even though I didn't think I particularly liked it, I found that I went back for another spoonful... and another... and another.

Hmmpt. Perhaps that's why it was described as seductive. Happy Valentine's Day everyone.

Update: I ate a piece of cake the day after I baked it, and the beetroot wasn't as pronounced. It's moist like a mud cake, but didn't seem as heavy. So I've decided that this cake is REALLY REALLY REALLY good! In fact, I think it's one of the best chocolate cakes I've ever made.

See previous Cookbook Challenge posts here.

Update: see the round up at My Food Trail.

Moist chocolate beetroot cake


If you'd like to make this cake - check out the recipe here. PS: the cake photo on the website is NOT of the chocolate beetroot cake. It's a beetroot seed cake in the book.


Saturday, February 13, 2010

Footscray Lunar New Year Festival

We went to the Footscray Lunar New Year Festival recently - Chinese New Year is tomorrow, but the Festival was held a couple of weeks ago. It was a hot and windy day, so we showed up at Footscray early in an effort to beat the heat.

We did a quick lap of all the stalls, and then decided we would have yum cha and then return to the Festival. We headed to our usual yum cha haunt - Dai Duong.

Yum cha in FootscrayYum cha in Footscray


We pretty much ate all our usual stuff. The first two things we had were pork buns and radish cake. Alastair ate both the pork buns, so I don't know what they were like, but the radish cake was good.

Yum cha in FootscrayYum cha in Footscray


Bro said yes to a basket of tripe. The tripe was really good - lovely flavour and not too chewy. I know most people don't like tripe, but it's really so good! We also had some pan fried pork dumplings. I love these with red vinegar.

Yum cha in FootscrayYum cha in Footscray


Next up was a basket of steamed dumplings - I think these had prawn and garlic chives. They were fantastic. The wrappers were smooth and thin, and they had big pieces of prawn in the filling. We also had beef cheong fun, which were fine.

Yum cha in FootscrayYum cha in FootscrayYum cha in Footscray


Yum cha isn't over until Bro has eaten a basket of chicken feet (normally a whole basket by himself) whereas I don't leave until I've eaten an egg tart. There were only two egg tarts per plate, so we had to get two plates so everyone received one. I got to eat the extra one. Wahoo! Alastair finished off with a bowl of dessert tofu.

Read about a previous visit to Dai Duong here.

Footscray Lunar New Year Festival


After filling up on yum cha, we went on a walk through the festival and took some photos. Unfortunately we were too full to eat anything! Waah! There was lots of grilled stuff going on.

Footscray Lunar New Year Festival


More grilled stuff.

Footscray Lunar New Year FestivalFootscray Lunar New Year Festival


I was full, but still bought a drink - this was a basil seed drink with what I think was grass jelly. It was kind of strange. The seeds sort of looked like tadpoles!

Footscray Lunar New Year Festival


There were lots of dodgy looking rides and games.

Footscray Lunar New Year Festival


Some kids looked like they were having fun on the rides, but I don't know if I'd trust my life on them!

Footscray Lunar New Year Festival


The MFB had a tent, and they were giving out paper models of fire engines - complete with road cones and little paper firemen! Squee!!

Footscray Lunar New Year FestivalFootscray Lunar New Year Festival


We arrived just in time to see the firecrackers being lit, but unfortunately there was a crowd and I couldn't manage to get a photo. Afterwards there was a lion dance. A stall was also selling funky balloons.

Footscray Lunar New Year Festival


Some more drinks on offer.

Footscray Lunar New Year Festival


And more grilled stuff - corn, betel leaves and meat on skewers.

Footscray Lunar New Year Festival


There was also dried squid hanging up for sale.

Footscray Lunar New Year Festival


This was a big pile of betel leaves stuffed with beef.

Footscray Lunar New Year Festival


And egg cakes (I think! Someone correct me if I'm wrong!)

Footscray Lunar New Year Festival


I have no idea what this was, but it was GREEN. And HIGH. How could I not take a photo??

Footscray Lunar New Year Festival


Happy Chinese/Lunar New Year and Valentine's Day! We aren't doing anything for CNY (I haven't even cleaned the house - gasp!) but we are going out tomorrow for a late lunch/early dinner. More later. I hope everyone has an auspicious and love filled day!


Related Posts with Thumbnails